Instagiffer Download
free
Download
Review Instagiffer
Instagiffer allows us to create animated GIF files from video files, Youtube videos, or screen recordings.
Animated GIF files are composed of a succession of static images, displayed one after the other, creating an animation or motion. These GIF files are treated as images, not video files, so they can be embedded in web pages, chat rooms, or any other system that accepts images.
With the rise of social networks, it has become fashionable to create animated GIF files of short duration, shocking content, humorous or sensual, etc. To create this kind of animated file, we usually use image editors software. The following software fills a gap in the world of animated gif creators because its unique feature is the creation of animated gifs directly from videos.
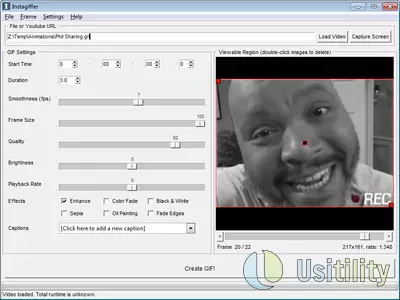
Instagiffer allows us fast and easy creation of animated gif files. We can use a video file on our hard drive or the URL of any Youtube video to create an animation. We may even be able to create an animated GIF of a zone of our desktop since there is the option of capturing the desktop.
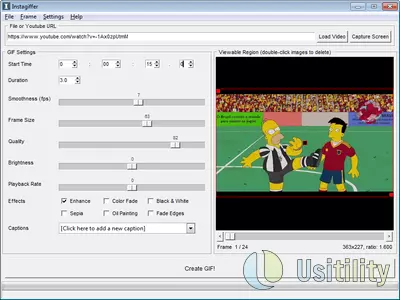
Once we've selected the video source we want to create the animation, we must adjust a series of controls to create the animated GIF we have in mind.
The first thing we need to do is to locate the starting point of the video where we want to start our animation. Once we know the exact time of the start, we must enter it in the program, indicating the minute and second. After that, we must indicate the animation duration. This duration is measured in seconds since this type of animated gif tends to be short, between 3 and 10 seconds. Once we've configured the start point and duration, we can preview the video's selection that will be converted to animation.
Now we can set the following parameters:
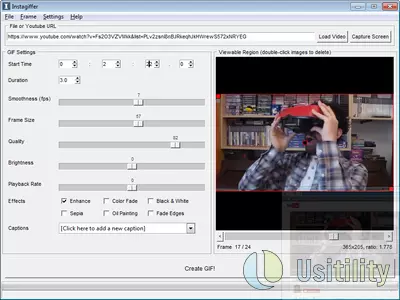
- Smoothness: This option indicates the number of frames per second (FPS) we want to include in the animation. For example, if our animation lasts 3 seconds, and we set 15 FPS (Frames Per Second), the animation will be composed of 45 images. This will result in a very soft animation but with a big size. However, if we set the animation to 3 FPS, the file will contain 9 images, which will cause the animation to be more abrupt but save size.
- Image size: this option sets the animation resolution. If we move the bar to the right, the resolution will increase. If we do so to the left, the resolution is reduced. We can see the exact resolution if we look at the number just below the preview image of the animation. More resolution means a bigger file size.
- Quality: here, we will adjust the quality that will have the images composing the final animation. If we reduce the quality, we will see as the images fade in color, it reduces the number of colors on the screen and decreases the definition. Also, this option will influence the final size of the file lively. The higher the quality, the larger size of the file.
- Brightness: this option is used to adjust the animation's brightness level.
- Playback speed: here, we are going to adjust play speed. It will create the sensation of fast or slow motion.
- Effects: this option allows us to apply some visual effects to the final animation, such as black-and-white, sepia, oil painting, etc.
A section highlighting Instagiffer is in the subtitle because we can easily create subtitles with different font types, in various locations, and at different animation times.
When you click on “add subtitles,” you will see the following options:
- Text: we must input the text we want to display on the screen.
- Font, size, and color: with this option, we choose the font type that we want, the size, and the color. When we choose a font type, we'll see the same sample at the bottom.
- Style: we can choose boldly, underline, italics, etc.
- Blinking: if we want the text to blink on the screen, we can choose blink speed.
- Position: we've several positions where we can place text: top, center, bottom, left, right, etc.
- Start and end Frame: here, we will determine the frame that shows the text for the first time and the “frame” in which it disappears.
Once we have all the parameters configured, we must click the button “Create GIF,” The program will generate a .gif file with the animation we designed.
If the resulting animation exceeds certain dimensions or sizes, the program will display a notice indicating that we cannot upload that animation to Imgur or Tumblr.
This software will undoubtedly delight those who love to create gif animations from videos because it is easy to use and allows us a wide range of configurations without forgetting that the software is free.
Frequently Asked Questions
- Is Instagiffer downloadable for Windows 10?
- Yes, this software can be downloaded and is compatible with Windows 10.
- What operating systems is it compatible with?
- This software is compatible with the following 32-bit Windows operating systems:
Windows 11, Windows 10, Windows 8, Windows 7, Windows Vista, Windows XP.
Here you can download the 32-bit version of Instagiffer. - Is it compatible with 64-bit operating systems?
- Yes, although there is no special 64-bit version, so you can download the 32-bit version and run it on 64-bit Windows operating systems.
- What files do I need to download to install this software on my Windows PC?
- To install Instagiffer on your PC, you have to download the instagiffer-1.41-setup.exe file to your Windows and install it.
- Is Instagiffer free?
- Yes, this program is free so you will be able to use it without any limitations, and without additional cost.
- Home
- Instagiffer home
- Category
- Operating Systems
- Windows 11
- Windows 10
- Windows 8
- Windows 7
- Windows Vista
- Windows XP
- License
- Freeware