How to delete ShareX watermark
How-ToShareX is free software that allows us to make screenshots in Windows. It certainly offers great functionality and allows us to take screenshots in a simple way and quickly.
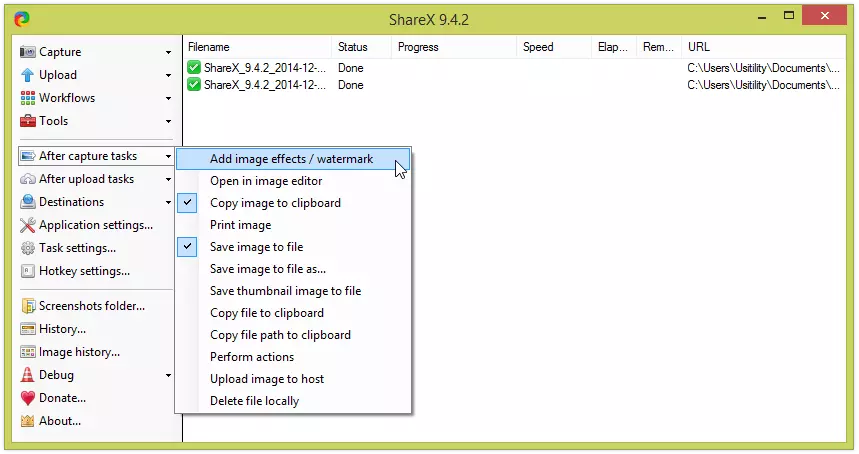
Note 1: Thanks to a comment posted by Jaex, who is the author of this software, we have known that in the latest version of the program the watermark option is not turned on by default. Note 2: In the same comment the author tells us a simpler way to turn off the watermarks that were inserted by the program in the images. We recommend you to follow these instructions, as they are faster and more direct than the ones we have posted on this blog. Here it goes:- In the left pane click on the " After capture tasks ", and uncheck the option of " Add image effects / watermark ".
 As you can see, this way is more simple than the one we propose in this blog, so from here, we would like to thank to Jaex the comment posted correcting the information written on this post. Even so, we leave the original information so you can see how to modify the default watermark.
 In the latest versions of the program, a watermark is inserted automatically on every screenshot that we make. This watermark is very easy to remove and avoid it to be inserted into the images. We are going to see how to remove the watermark inserted automatically by ShareX:
The first thing we must do is to click on the “ Task settings... ” option located on the left part of the screen.

On the new screen, we click on the “Image” tab, and within this option, we must click on the “ Effects ” tab.

A new screen (“ Image effects ”) will be opened. On the left, we see two options that are selected: “ Canvas ”, and “ Text watermark ”.

We select “ Canvas ” and press the keyboard's “Delete” key, so this option will be deleted.

We select “ Text watermark ” and delete it using the “Delete” key.

As we can see, the “ Image effects ” window will not display any kind of option on the left side of the screen
Now we only need to close the “ Image effects ” window by clicking on the “ OK ” button located at the bottom right of the window.
And now we can take screenshots. without the watermark inserted on them.
If we want to change the text and color of the watermark, we only need to modify the “ Text ”, “ TextColor ” and “ BackgroundColor ” parameters, located on the “ Text watermark ” option. This way, we can insert a custom watermark in every screenshot we make.
If you want to download and know more about ShareX, you can do it from here.


